


Lately, you have heard a lot about IoT, the Internet of Things, from utilities to healthcare, from production to public administration, there are now many sectors and working areas affected by the technological innovation of the IoT, with different levels of development.
The Internet of Things refers to a set of technologies that allow any type of device to be connected to the Internet. Basically, the purpose of this type of solution is to monitor, control, and transfer information to then carry out consequent actions. In the city, for example, a detector located in a street can check the street lamps and report if the lamp is working, but the same detector could, if properly equipped, also report information on air quality or the presence of people.
IoT devices are devices capable of carrying out data collections in an increasingly precise and targeted way according to specific application areas. It could be equipment dedicated to detecting data related to the temperature of environments, the movement of vehicles, air quality, noise in certain environments, or the presence of certain substances. There are numerous examples. These are sensors that detect information and transform it into digital data.
The sensor then “talks” about its temperature, detected movements, and the quality of the air, and “puts these data on the network”, thus data are transferred from sensors to the net through the network connection. With this step, we enter the Internet of Things which then does an important job on data. We can classify IoT devices according to an increased level of complexity as follows:
- Connected devices capable of detecting a certain type of data and capable of communicating data
- Connected devices capable of detecting multiple types of data and transferring this data
- Connected devices capable of performing a very first level of processing (selection) of data locally and transfer only data that correspond to certain requirements
- Connected devices capable of collecting data, carrying out the first level of selection, and carrying out actions based on the indications received
- Connected devices capable of detecting data, selecting them, transmitting only those necessary for the projects in which they are involved, carrying out actions based on the indications received, and carrying out actions according to a local processing capacity
Therefore it is extremely important to process, collect and analyze large volumes of data in real-time, and for this, there is a need for integrated systems between big data, NoSQL databases, and IoT data.
A video camera is no longer only able to send data and images, but it is able to do so intelligently, depending for example on the images taken or the external temperature or brightness. In this way, it is able to adapt its behavior according to parameters of interest that can evolve over time.
Our watch can remind us of appointments and can check if we actually respect them. It can, for example, know if we are or are not in a certain place at a certain time, and, in the latter case, depending on the distance, it can alert us that we have to hurry because otherwise, we are late.
The packaging of food products can transfer important information on the quality of the product, the way it was made, and all those who participated in the production and who are part of the food supply chain.
The packaging of a drug can warn us if we are not taking it as established and can tell us how to remedy a possible forgetfulness.
Cars can constantly communicate with the surrounding environment and can facilitate our driving, increasing comfort and safety.
What can actually be detected and measured is extensive. Here are some examples of detecting devices:
- Air temperature detectors;
- Pressure detectors;
- Motion sensors;
- Brightness detectors;
- Moisture detectors;
- Environmental and territorial sensors;
- Orientation in space detectors;
- Proximity sensors;
- Brightness detectors;
- Electromagnetic wave detectors;
- Radio frequencies detectors;
- Electricity, voltage, current detectors;
- Gas detectors;
- Sound detectors;
and more.
Programming IoT devices
The Internet of Things finds more and more consensus and represents more and more an opportunity for development and now you are thinking of finding work in the sector. Programming may be what you are looking for.
The Internet of Things, with its plethora of applications and devices, is destined to become one of the largest sectors (both in terms of turnover and in terms of users) of the hi-tech world. This is not the “usual” high-tech bubble. Basically, any new technological object today has a “soul” connected to the Internet and is remotely controllable with a smartphone or computer.
The thought that haunts you is probably justified: if you could design an IoT device capable of attracting the attention of users, perhaps with the collaboration of Kickstarter or another crowdfunding platform, you would have a good chance of accumulating a small fortune.
A generic IoT object is made up of:
- Mechanical hardware and casing
- Analog hardware (power supply, encoder …)
- Digital hardware (CPU, DAC …)
- Communication hardware
- Sensors
- Actuators
- Server software and communication protocol
- Client software
If, however, transistors and chips are not exactly your favorite subject, you can still be able to “take advantage” of the IoT trend by focusing on the last point listed above and honing your programming skills. For IoT devices to work, in fact, they must be “accompanied” by software and applications capable of making the most of their technical characteristics. In short, it will be enough to learn a new programming language or improve the skills of those you already know to be able to find a job that also can be quite remunerative.
The main programming languages for IoT
Some programming languages are better suited than others for the world of the Internet of Things. Their characteristics make them particularly appropriate to allow the development of applications and software capable of making the most of IoT devices. At the moment, the choices of the most experienced developers fall on Java, C, and C ++.
These last two programming languages, in particular, seem to be perfect for those who decide to take their first steps in this world. Learning to program in C and C ++, in fact, allows you to acquire the basics of the sector and create the first apps or applications to be distributed for the various IoT platforms. The programming language C and its advanced version C ++, in fact, allow you to create very useful scripts for basic functions such as temperature detection, remote control of connected appliances, and other “low-level” actions. Java, another “generalist” programming language, allows you to develop software capable of performing more complex actions, while not increasing the burden of difficulty on the programmer’s shoulders. Despite being a high-level language, in fact, it is rather light and versatile, useful for creating graphical interfaces that are attractive and pleasing to the eye.
Python is another programming language that is quite popular with a slice of IoT programmers. Versatile and powerful at the same time, it finds many fans among web developers, but it could soon become a constant in the world of the Internet of Things as well. Similar speech for Javascript, even if according to many the Python features are more suitable for the purpose.
Other programming languages specific to the IoT
Obviously, there are not only programming languages borrowed from other sectors and “dropped” from above. If you want to get serious, you can decide to learn programming starting from languages created specifically for IoT devices and for the ecosystem of connected objects. Google and Nest, for example, have devised Weave, a network application layer protocol and a comprehensive toolkit for building connected Internet of Things-class applications, that works across multiple IPv6-bearing link technologies such as Ethernet, Wi-Fi, cellular, and Thread and has adaptations for Bluetooth Low Energy point-to-point wireless links. Apple, on the other hand, focuses strongly on Swift, a language designed for native applications for iOS and macOS but which could also find another outlet channel in Home, the new IoT platform of the Cupertino house.
A practical example in C
Let’s do it. Let’s program our first IoT device.
We will use the ESPertino board, a board based on ESP32, designed and produced in Italy by Elettronica Open Source. It does not have large computing capabilities but, in addition to WiFi and Bluetooth, it has interesting standby capabilities with very low absorption, and direct control of electrical loads powered at 220V.
One of the duties of the electronic designer, in general, is to provide the simple but burdensome functionalities of electrical interfacing, board protection, and signal conditioning, always required when the analog and digital world meet and must coexist in the same object.
ESPertino was selected because it is satisfied with a single 5V power supply, uses the two most important wireless protocols, and can directly control electrical loads thanks to the onboard relays.
The simplest and most useful thing in an IoT object is its wireless and Internet control. In our example, we are going to modify a floor lamp to make it possible to turn it on and off via the internet.
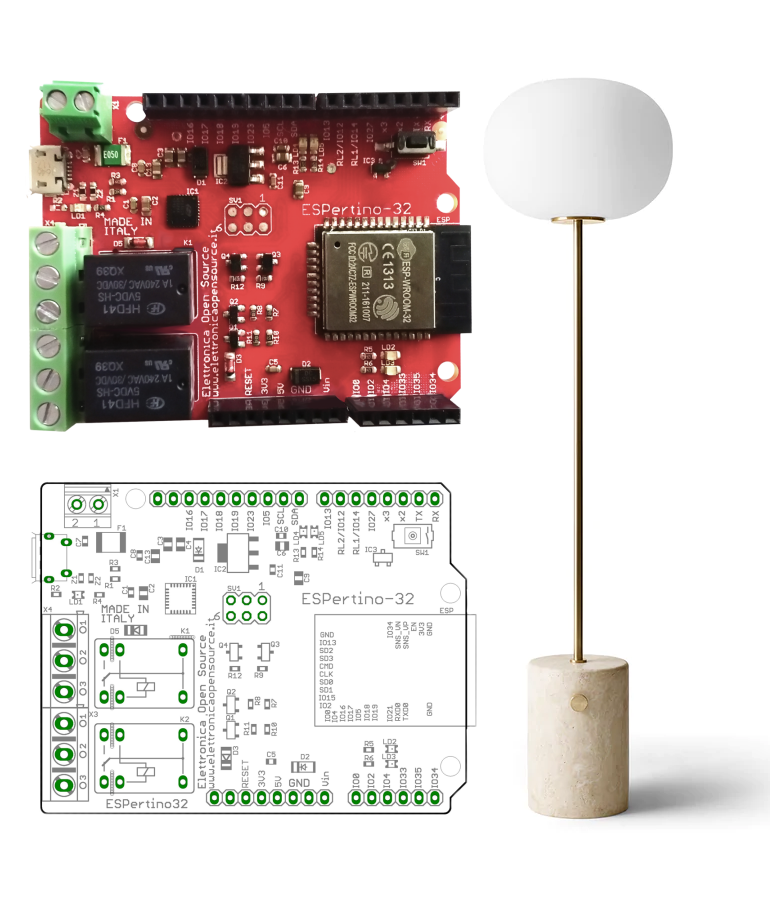
Plugging a mains-powered ESPertino board into an available empty space, the hardware work is reduced to connecting wires; the software, on the other hand, although simplified by the sophisticated libraries available, remains non-trivial.
After modifying a normal electric extension cable to insert our card, let’s start talking directly about software.
The library for the ESPertino board can be downloaded from the following link. Before this it is necessary to install the latest version of Arduino IDE and Silicon Labs CP21202 drivers.
Project specifications
The project software must allow you to control an electrical load from the Internet.
We list some simple specifications:
- The controlled object must be connected via wireless;
- The object must be powered at 220V;
- The controller must be able to be inserted into the original object.
Software functionality
The control interface will be created with a web server, which must reside on the board itself.
The ESPertino board allows you to control two electrical loads, has an LED that can be managed directly via software, and has a temperature sensor. We extend the scope of the project to control also these additional elements, in order to make the software developed even more versatile and reusable.
The two network functions, web server, and WiFi interface will be obtained using prepackaged libraries.
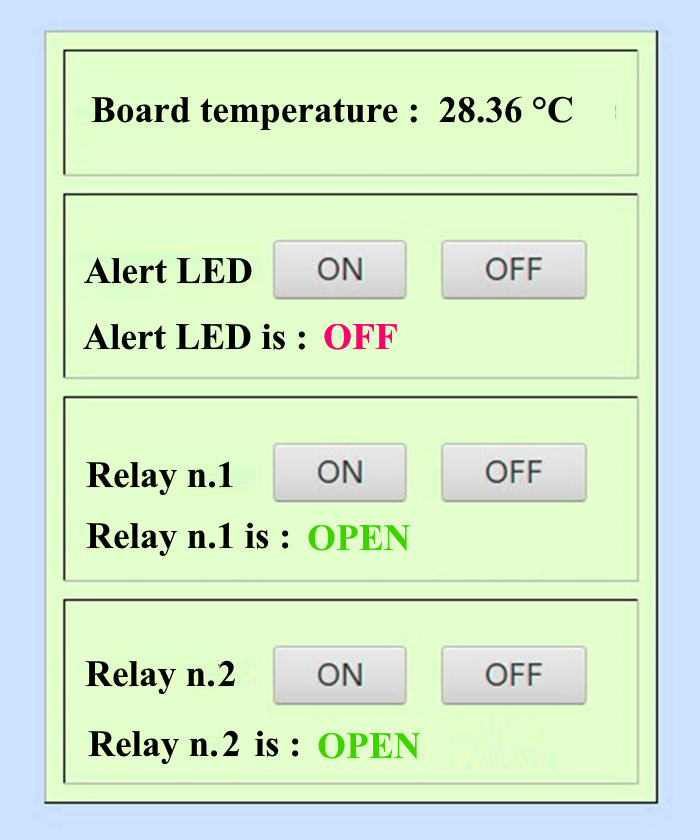
Web interface mockup
Software structure
The software of a microcontroller, however advanced, even today often runs on Bare Metal, that is a computer system without a base operating system (OS) or installed applications, and hence directly on the CPU, without the presence of an operating system or a monitor.
It must therefore be a statically linked executable, possibly compiled using specialized libraries in order to limit the amount of software to be written (and debugged). Memory is reduced, there is no virtual memory manager and not even the possibility of multitasking, thus we must go back to remote times and program carefully, cutting down to the very core to spare the few resources available.
The basic structure
#include <WiFi.h>
void setup() {
  // put your setup code here, to run once:
}
void loop() {
  // put your main code here, to run repeatedly:
}
The client software
Each main program for an Arduino-like controller is written in a version of C, and consists of three parts:
- Declarative part – contains declarations of variables and loading of library modules;
- Setup part – initializes hardware & software, carrying out all those operations that must be performed only when the IoT object is turned on;
- Main loop – where everything happens and where everything needs to be done.
Initialization section
#include <WiFi.h>
// ssid and password required to connect to the WiFi network
const char * ssid = "virtualgrub";
// enter the SSID of your WiFi network
const char * password = "123456789";
// enter your WiFi network password
// definition of the I / O pins used
#define USER_LED 5
// pin to which the led available to the user program is connected
#define RELAY_1 12
// pin to which the first relay is connected
#define RELAY_2 14
// pin to which the second relay is connected
// support variables
char buffer_line [80];
int counter = 0;
boolean empty_line;
char version_sw [6] = "1.1.9";
// instance of the web server, created on port 80 WiFiServer server (80);
Setup section
void setup()
{
  // pin initialization (direction and initial state)
  pinMode(USER_LED, OUTPUT);
  pinMode(RELAY_1,  OUTPUT);
  pinMode(RELAY_2,  OUTPUT);

  // temperature sensor and DAC setup
  // pinMode(36,  OUTPUT);
  analogReadResolution(12); //12 bits
  analogSetAttenuation(ADC_0db);  //For all pins
  // controller state initializing
  digitalWrite(USER_LED, HIGH); // led switched off
  digitalWrite(RELAY_1,  LOW);
  digitalWrite(RELAY_2,  LOW);

  // serial port initialization: baudrate 115200
  Serial.begin(115200);

  // WiFi network connection
  Serial.println("+---------------------------------------------+");
  Serial.println("|  This is your first IoT application |");
  Serial.println("|  Web server for LED and 2 relays control   |");
  Serial.println("+---------------------------------------------+");
  Serial.println(version_sw);
  Serial.print("  WiFi connection: ");
  Serial.println(ssid);
  WiFi.begin(ssid, password);

  // wait loop until the connection is established
  while (WiFi.status() != WL_CONNECTED)
  {
    delay(500);     Serial.print(".");
  }
  Serial.println("Connection to WiFi Network OK!");
  Serial.println("DHCP gave IP address: ");
  Serial.println(WiFi.localIP());

  // server start
  server.begin();
}
Main loop
void loop()
{
  // waiting for a connection from a client
  WiFiClient client = server.available();
  if (client)
  {
    Serial.println("New client request");
    // support variables initialization
    memset(row_buffer, 0, sizeof(row_buffer));
    counter=0;
    // every http request always ends with a blank line
    boolean empty_row = true;

    while (client.connected())
    {
      if (client.available())
      {
        char c = client.read();
        Serial.write(c);
        // HTTP request read, character by character
        row_buffer[counter]=c;
        if (counter < sizeof(row_buffer)-1)
          counter++;
        // if you have reached the end of the line, and the line is empty,
        // the http request is finished. Then proceed with sending the reply
        if (c == '\n' && empty_row)
        {
          // sending the standard HTTP response header
          int led = digitalRead(USER_LED);
          int rly1 = digitalRead(RELAY_1);
          int rly2 = digitalRead(RELAY_2);

          // temperature reading and scaling
          int reading = analogRead(36);  // current voltage off the sensor
          float voltage = reading * 3.3;  // using 3.3v input
          voltage /= 4096.0;
          // divide by 1024
          float temp = (voltage - 0.5) * 100 ;
          //converting from 10 mv per degree with 500 mV offset
          float temperature = temp * 0.16;  // scaling

          String header_risp = "HTTP/1.1 200 OK\r\n";
          header_risp += "Content-Type: text/html\r\n";
          // connection will be closed after the response
          header_risp += "Connection: close\r\n";
          header_risp += "\r\n";

          header_risp += "<!DOCTYPE HTML>\r\n<html>
                          \r\n<head>\r\n";
          ...
          header_risp += "<h2>This is your first IoT application</h2>\r\n";

          if (c == '\n')
          {
            // start of a new line
            empty_row = true;
            if (strstr(row_buffer, "GET /led_on") > 0)
            {
              Serial.println("USER LED ON");
              digitalWrite(USER_LED, HIGHT);
            }
            else if (strstr(row_buffer, "GET /led_off") > 0)
            {
               ...
	    }

            // start of a new line
            empty_row = true;
            memset(row_buffer, 0, sizeof(row_buffer));
            counter=0;
          }
          else if (c != '\r')
          {
            empty_row = false;     // the row has 1 or + characters
          }
        }
     }

     // pause necessary for the browser to receive the data
     delay(1);

     // connection close
     client.stop();
     Serial.println("client disconnected");
   }
}
Firmware Boot
ets May 3 2022 00:09:22
rst:0x10 (RTCWDT_RTC_RESET),boot:0x13 (SPI_FAST_FLASH_BOOT) configsip: 0, SPIWP:0x00
clk_drv:0x00,q_drv:0x00,d_drv:0x00,cs0_drv:0x00,hd_drv:0x00, wp_drv:0x00 mode:DIO, clock div:1 load:0x3fff0008,len:8 load:0x3fff0010,len:2016 load:0x40078000,len:7780 ho 0 tail 12 room 4 load:0x40080000,len:252 entry 0x40080034
+---------------------------------------------+
| This is your first IoT application |
| Web server for LED and 2 relays control |
+---------------------------------------------+
1.1.9
WiFi connection:: virtualgrub ....
Connection to WiFi network: OK!
DHCP gave IP address:
100.101.102.103
Serial Output
New client request
GET / HTTP/1.1
Host: 100.101.102.103
User-Agent: Mozilla/5.0 (X11; Linux x86_64; rv:52.0) Firefox/52.0
Accept: text/html,application/xml;q=0.9,*/*;q=0.8
Accept-Language: en-US,en;q=0.5
Accept-Encoding: gzip, deflate
Connection: keep-alive Upgrade-Insecure-Requests: 1 client disconnected
HTML generated
<!DOCTYPE HTML>
<html>
<head>
<meta name="viewport" content="width=device-width">
</head>
<body bgcolor=ccccff><font face=Courier>
<center>
<h2>This is your first IoT application</h2>
<b>
<table bgcolor=ccffcc border=1 cellpadding=10 cellspacing=10>
<tr><td>
<p>Board temperature : 28.36 °C</tr></td>
<tr><td>
<p>Alert LED
<a href="led_on"><button>ON</button></a>
<a href="led_off"><button>OFF</button></a></p>
Alert LED is : <b><font color=ff0000>OFF</font></b> </tr></td> ...
...
<p>Relay n. 2
<a href="relay2_on"><button>ON</button></a>
<a href="relay2_off"><button>OFF</button></a></p>
Relay n. 2 is : <b><font color=00ff00>OPEN</font></b> </td></tr>
</table>
</b>
</center>
</body>
</html>


[…] Internet of Things: Programming Languages and a Practical Example […]